Building and Deploying Data-Aware AI Agents in Databricks with Claude Opus 4: An End-to-End Python Tutorial

Introduction
Just a few days ago on May 23Databricks dropped a huge update: you can now run Claude Opus 4 and Sonnet 4 right inside your Databricks workspace. In plain terms, that means you can build AI agents that tap directly into your own data lakes, run on secure infrastructure, and follow governance rules you set up. If you’ve ever wanted to give your analytics team a chatty helper that truly understands your data, this is the moment.
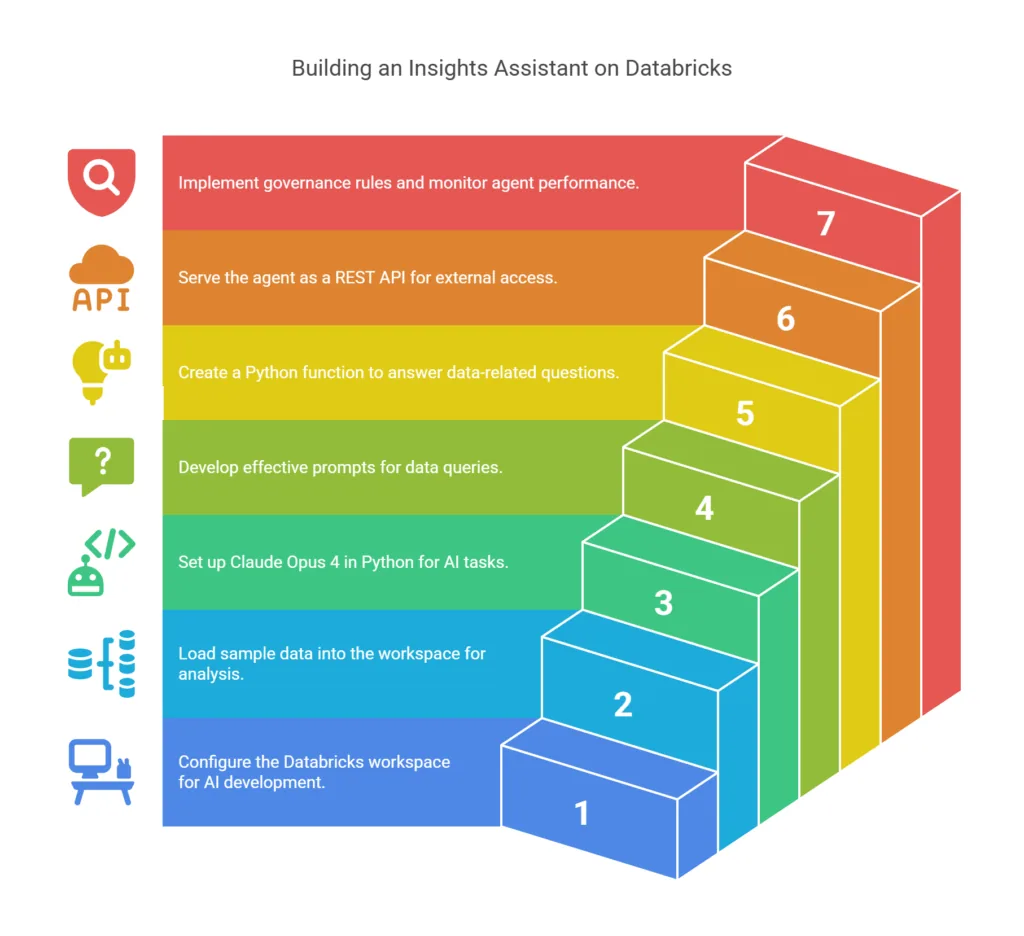
In this guide, you’ll learn how to spin up a mini “insights assistant” on Databricks. By the end, you’ll have a Python-powered agent to answer questions like “What were the top five pickup zones by average fare in January?” or “Show me the daily trip count for February.” We’ll walk through every step, from setting up your workspace to deploying a REST API that others can call. Let’s dive in.
1. Environment Setup
First things first: let’s get a workspace ready.
- Sign up for Databricks (if you don’t already have an account). You can try the free trial here.
- Create a cluster using the latest Databricks Runtime. A small Standard node works fine for our demo.
- Install the Databricks Python SDK. In a notebook cell or your local machine, run:
pip install databricks-sdk
4. Configure your credentials by setting environment variables. On your local shell:
Replace <your-workspace> and <your-personal-access-token> with your values. With that, the SDK can talk to your workspace without you typing in passwords each time.
2. Ingesting Sample Data
We need some data for our agent to explore. Let’s pick the popular NYC taxi dataset.
We need some data for our agent to explore. Let’s pick the popular NYC taxi dataset.
- Upload the CSV to DBFS (Databricks File System). In a notebook cell:
You can also use the UI’s “Data” tab to upload files, then note the DBFS path.
- Load into a Delta Lake table. In a notebook cell:
Now you have a table called nyc_taxi_jan2023, ready for questions.
3. Initializing Claude Opus 4 in Python
Next, let’s hook into Claude Opus 4 using the Databricks AI client.
- Install the AI package (if not already):
- Set up your Python code:
3. Configure parameters for generation:
With that, you’re ready to chat with Claude over your data.
4. Crafting Prompts for Data Queries
To get helpful answers, we need to give Claude the right context.
- Table schema prompt:
- Example query prompt:
- Send to Claude:
You should get something like:
5. Building an “Insights Agent” Function
Let’s wrap this logic so we can reuse it.
This function keeps track of the last question and answer, so Claude can stay “in the loop.”
6. Serving the Agent as a REST Endpoint
You might want to let other apps call your agent. FastAPI makes this easy.
- Install FastAPI and Uvicorn:
- Write the API (
app.py):
- Run the API:
Now, POST JSON like {"question": "How many trips on Jan 15?"} to localhost:8000/query and you’ll get back the SQL and explanation.
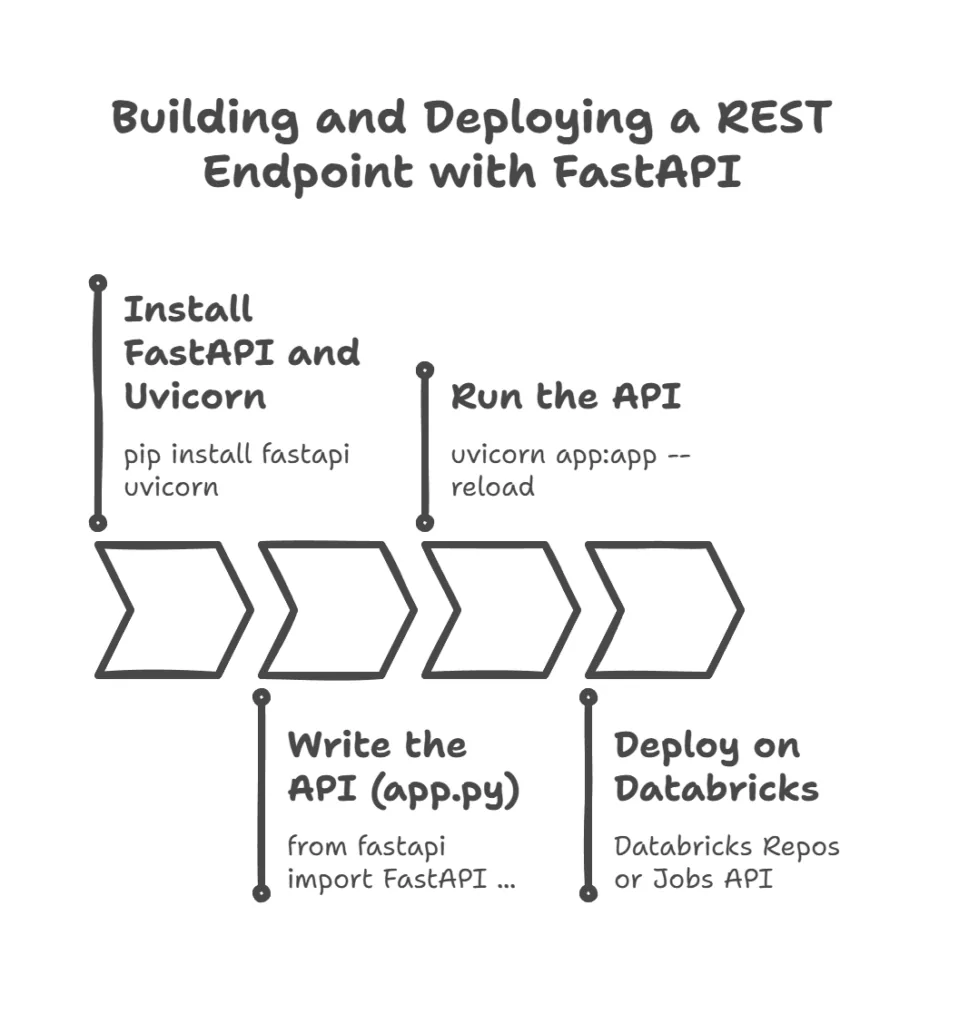
To deploy on Databricks, you can use:
- Databricks Repos: push this code into a repo, attach to a cluster, and run as a job.
- Databricks Jobs API: schedule the FastAPI service as a long-running job.
7. Governance and Monitoring
Databricks makes it simple to keep an eye on usage.
- Model versions: In the UI, under Model Registry, you’ll see each version of Claude Opus 4 you’ve used.
- Usage logs: With the Python SDK, you can pull recent prompts:
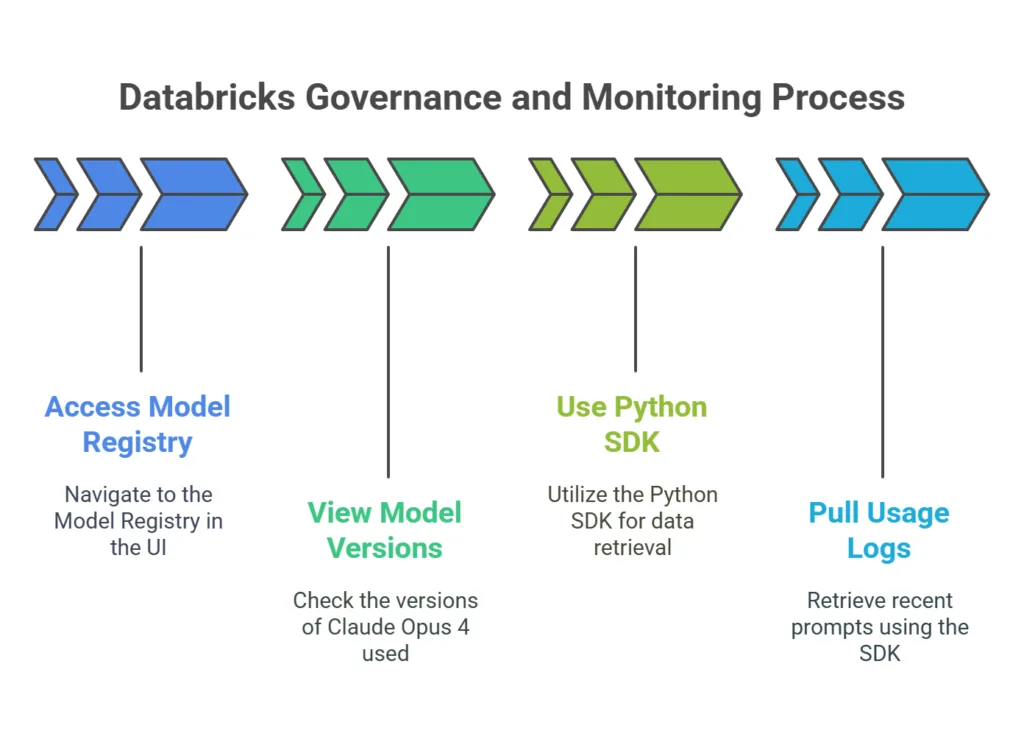
This helps you spot strange patterns, track cost, and ensure your agent is behaving as expected.
Wrap-Up and Next Steps
Congratulations you now have a live, data-aware AI agent running on Databricks with Claude Opus 4! Here are some ideas to take it further:
- Vector search: Add embeddings of past queries so your agent can recall older conversations.
- Dashboards: Plug the agent into a Streamlit or Dash app for a slick GUI.
- BI integration: Expose the
/queryendpoint to Power BI or Tableau via a web connector.
For more details, check out the official docs:
- Claude Opus 4 on Databricks AI
- Sonnet 4 capabilities
- Databricks Python SDK reference
I hope this tutorial gave you a clear, hands-on path to building and deploying your own AI assistants. Now go forth and let your data speak your team will thank you!